In the summer of 2010, through circumstances that I don’t quite remember, I came across a web site where amateur astronomers were using the Internet to stream images captured in their telescopes using small video cameras that could be programmed to do time exposures. Here, with just “a bit” more work than it took to try and see the same objects with your eyeballs you could actually see an image of the object that, while not approximating even longer time exposures with astronomical cameras taken through space telescopes, was at least more than a faint white patch barely peeking out through the haze and light pollution of my suburban sky. Clearly this required investigation.
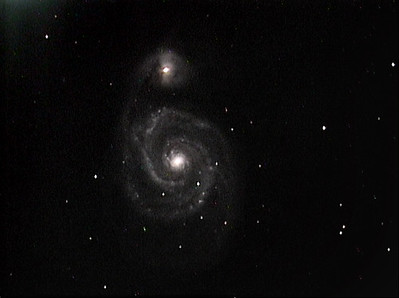
Over the next year or so I slowly collected the equipment and skills needed to set up a system like this for myself. The trick in all of this is to be patient and slowly move towards the goal one small step at time. Eventually I had put together a pretty powerful equatorially mounted telescope tube, camera system, and a bit of image processing know-how. I could set up and get stuff like this:

or this:
It was pretty easy. All you had to do each night was this “short” checklist of setup items to make the telescope point at the right place and take pictures in focus: http://mutable-states.com/grab-and-go.html.
Later on, of course, I dabbled with “real” astronomical CCD cameras and an even fancier mount and all of the attendant complications. I got some pretty good pictures and then put it away when it got to be too much like work. I’ll pick it up again later. Anyway, to set that system up you did this: http://mutable-states.com/maxim-dl-setup-and-workflow.html.
The basic pieces that you need to take pictures of things in the sky are:
A telescope tube with a CCD camera attached to it.
A computerized mount that can point at things and automatically know where it is pointing.
Software to set up and control the pointing system and then later track objects that you are capturing over time so you can take long exposures.
Software to capture and combine the frames from the camera.
But, this list is just a high level summary. If you expand the list above into a more detailed list of everything you would want to maximize ease of use and automation, you actually end up with a list of a dozen or so bits and pieces that you need to set up every night.
Traditionally what the intrepid astronomy hobbyist would do is read the magazines and online forums, buy all of these bits and pieces of hardware and software to fulfill each of the above requirements and then hand integrate the pieces until they had something that they could use each clear night to capture images. The main thing that stands in the way of people using cameras more routinely for astronomy is the complexity and headache of setting up all this stuff.
What you really want is a system that works like this:
Put the telescope in the yard.
Point it somewhere and take a picture.
Plate solve (1) the picture so the mount knows where it is pointing.
Fine tune focus.
Take pictures.
This kind of operation was possible in 2011 and 2012 … but it took a lot of manual integration work, and was much easier if you had a permanent installation. Still, one always wondered how many tens of dollars someone might make if they could build the whole stack in one box.
Well, 2020 is the year we start to find out. While bits and pieces of this sort of automation have started to show up in the high end and the low end of the telescope equipment market, no one had really tried to make a true one piece solution until now. I am here to report on one attempt at this, the Unistellar eVscope.
The claim for this telescope is that you put it out in the yard, run some software on your phone to control it, and it shows you things in the sky that you can’t see with your eyeballs in a normal telescope. I wrote this off as mostly hype until the beginning of this year when the machine finally shipped, and I found out that Mike Merrifield, the astronomer from Brady Haren’s Sixty Symbols youtube channel, had bought one. And, early on in the worldwide pandemic lockdown of 2020 they made a video about it. From the video it’s apparent that all you do with this telescope is:
Load some software on your phone.
Put it out in the yard.
Point it somewhere with stars and take a calibration picture.
Fine tune focus using a provided focusing mask (2).
Tell it to show you stuff in the sky that you can’t see with your eyeballs in a normal telescope.
I thought to myself: “what the fuck, it’s a pandemic, might as well try it.”
So I did. And it turns out here’s what you do to use the eVscope:
Load some software on your phone.
Put it out in the yard.
Point it somewhere with stars and take a calibration picture.
Fine tune focus using a provided focusing mask (2).
Tell it to show you stuff in the sky that you can’t see with your eyeballs in a normal telescope.
The telescope puts out a low power wifi network that you use to talk to it from the phone. The machine does a plate solve on the first calibration picture to figure out where it is pointing and fine tune the built-in mount a bit. Then when you point it at things, it goes to the general area, does a plate solve, and repoints based on where it computed itself to be pointing until it knows the object you wanted is close to the center of the field of view of the camera. Then it shows you pictures.
It has a “Live” video mode that can show you bright stars and things and another mode called “Enhanced vision” that does automatic image stacking. In the stacking mode it appears to take exposures that top out at about 15 to 30 seconds long depending on how the tracking is going. It then combines the frames together to improve the image quality over time. You can point it at something dim and have it chew for 10 or 20 minutes. The pictures get slowly better as the machine accumulates data and then you get images like this:

or
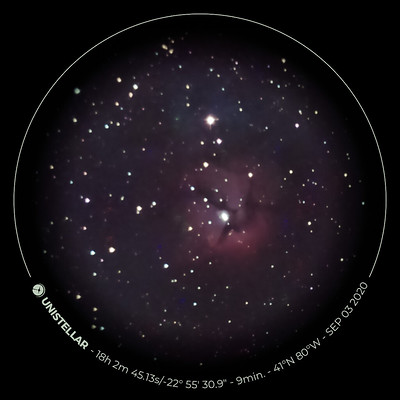
or

These are about as good as I got stacking mallincam screen shots back in the day. And, the computer in the telescope is doing all of it. The machine stores the raw frames on an SD card and it might be possible at some point to fetch them off and fuss with them yourself. But that’s not what this machine is for. This is for relatively quick and almost “live” views of dim objects that you have no hope of seeing from a suburban back yard, but which look pretty good in 5 to 10 (or up to 30) minutes through this tiny telescope.
The tube itself is a relatively small optic, only 4 inches across. Mounted to the tripod the thing weighs about 20lb and is easy to carry in one piece to the yard. The tube is permanently mounted to a motorized alt-az mount, like the small Celestrons. Instead of an eyepiece at the focus of the optical system there is a permanently mounted CCD video camera that does the image capture described above. The software for the “Enhanced” mode takes the individual time exposures and combines them into composite frames while also compensating for tracking errors and filtering out light pollution. All in all it’s pretty amazing.
The small optics and limited resolution of the CCD mean that the telescope is best at medium sized deep sky objects that will look good even if you can’t resolve a lot of fine detail. Dim extended things are not great because the optics are too small. Bright but small things like planets will be boring because they will be too small to show details. Where traditional telescopes are only really good for the moon and planets when observing from the city, the eVscope is sort of the opposite. The planets are no good at all, but dim “deep sky” objects that are normally either completely invisible in an eyepiece or at best … uninspiring … from suburban light pollution suddenly come to life and look a bit like the fancy photographs we are used to seeing now.
That said, this system will also not get you pictures that come close to the image quality what you would get with long exposures, equatorial mounts, and a dedicated cooled CCD camera. But hey, it’s point and click and only takes 10 minutes, so what you do expect?
Personally I’m looking forward to using this thing to do more quick and dirty galaxy hunting. I always loved looking at galaxies. The last astrophotograph that I took with my high powered CCD system was also my favorite … a medium deep shot of the galaxy cluster in Coma Berenices. Here it is, annotated with all the objects that you can see in the frame:

Galaxies are dim, but usually compact. So I think this small telescope will be able to do a decent job with them.
This scope will also be a great portable toy to take on trips to darker sky, assuming at some point it becomes possible to travel again without the possibility of spreading plague and death.
Finally, if I ever get back to doing “real” CCD pictures, having this thing around to look at other stuff while the main telescope chugs away will be endless fun.
All in all a great pandemic “what the fuck” purchase, if you have the spare cash lying around.
Here’s the flickr album with my pictures. I’ll add new ones there over time: https://www.flickr.com/photos/79904144@N00/albums/72157715841088797
Notes
To “plate solve” is to use computer software to compute the celestial coordinates of a given field of view based on the stars that appear there. You do this by comparing the field with known stars in an atlas. The weird name comes from the fact that we used to do this by hand with pictures taken on glass plates. Consumer software for this has been around for 20 years or so, but it did not start to get cheap or reliable until more recently.
Focusing telescopes with a camera attached can be tedious because the nature of time exposures makes it hard to tell when the stars are really sharp. The solution is to use a special mask in front of the telescope called a Bahtinov mask. When you have the focus right with the mask in place you get an easy to read diffraction pattern on a bright star. This telescope helpfully comes with one of these widgets built in to the dust cap for the tube. Nice.