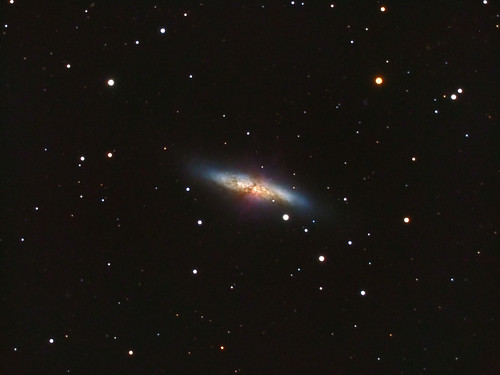
Spring in Pittsburgh remains cold and cloudy. But, I did get out for one night in March and managed to run my whole setup from end to end to get one picture. So as a final illustration of how the whole process works, I’ll describe step by step how I captured this shot of M82 that night.
Before I get started with the details, I have a few general notes. First, it’s not important that you work exactly how I work. What’s important is that you find a way of working that is comfortable for you. What is most important is that you do the same thing every single night no matter what. Astrophotography is technical and generally unforgiving of mistakes. Repetition and practice are powerful mechanisms for minimizing the number of mistakes that you will make in the dark and the cold.
It also helps to be conservative in setting out goals for a particular night. What I try to do is decide what one thing I want to achieve on a particular night (take a picture of those two things, or fine tune my polar alignment scheme, or whatever) and when I’m done with that one thing I tear down no matter how good the night is. Setting and hitting the goal you want decreases frustration and increases confidence, both of which are important for minimizing the number of mistakes that you will make in the dark and the cold.
The rest of this post goes over the particulars of what I do in Maxim DL to capture pictures. While the specific setup is particular to Maxim, the general scheme is not, so you should be able to translate it to however you end up working.
Maxim Preliminaries
As we’ve covered before, I have started to use Maxim DL as my main piece of software for image capture. I have two main reasons for this:
It has robust support for the SBIG ST-2000XM camera that I bought, with its unique configuration of two CCD chips.
I really like the image calibration and stacking workflow that it supports. It lets me set up all of the various parameters just once and then run as many images as I want with just one button.
Finally, its support for computer control of the mount, and the “plate solving” utility is really convenient.
The one thing it does not have is a particularly straightforward user interface. But, to get the basics set up is not too bad. You have to tell it what kind of camera you have. You have to tell it what sort of mount you have. And you have to tell it how to guide. The various dialog boxes that you use to do this are covered the extensive online manual.
For my setup, I use the SBIG Universal camera setup and then I connect to my mount using the AstroPhysics ASCOM Driver. ASCOM is a software framework for controller astronomy hardware (mounts, cameras, domes, etc). I’m not going to get into the details here. It seems to work but for the most part it also seems like its main reason for existing is to make your life more complicated.
As I mentioned in my previous post, I also have a set of calibration (dark, bias, flat) frames shot for my camera that I keep loaded into Maxim. I carefully keep my camera set up so that I can re-use flats and I generally shoot at the same temperature and using the same basic exposure times so that I can re-use darks. It’s convenient not to have to reshoot these frames every time even though my pictures would probably be better if I did so.
Mount and Tube Setup
I’ve gone over this a bunch of times in other posts. I use a Mach-1 mount that I keep torn down in my garage in a wheeled carrier. First I take the tripod and put it on my back patio with one leg pointing north. Then I roll the mount case out to the same place and I take the mount head out and put it on the tripod. I attach it using the three bolts, but leave them a bit loose so I can turn the mount head in azimuth for rough polar alignment. Then I attach the counterweights.
My telescope tube has a plate on its bottom that goes a QR saddle on the top of the mount. I go back in the house and grab the tube and slide the plate into the saddle and then tighten all the knobs down.
I keep the camera attached to the tube in the house. This leaves it set up in the same place every night which means that the optical system is pretty much always in the same configuration. So far this also means I’ve been able to keep using the same set of flats that I shot a few months ago. This probably won’t last.
After the tube is attached I make sure it’s reasonably balanced in the mount. The Mach-1 doesn’t really care. Then I put the mount in what AP calls the “Park 1” position. In this position the tube is pointing north and horizontal and the counterweight shaft is pointing east/west and is also horizontal. I use a level to fine tune things.
While I wait for it to get darker, I run cables from the mount and camera to my laptop. I then fire up Maxim and any other software that I want and get the ASCOM driver connected to the mount. Finally, I run back outside and power up the camera too. Maxim will then connect to it and tell it to cool down to shooting temperature. I try to use the same temp every night so that it matches the dark frames I already have.
Polar Align
Next I polar align. First, I wait for it to get dark enough so I can see Polaris through the polar alignment scope on the mount. This is a small telescope that sits in the right ascension axis of the mount. Astrophysics has a great new polar alignment telescope with a right angle viewer that makes this very easy. The new scope has a simple circular reticle shown here and there is software to tell you where Polaris should fall on the reticle. So, you just look in, put Polaris in the right box and then you are done.
After this initial setup I then run the “quick drift” finder-scope alignment that I have described before. I have also taken to using my camera to do software-assisted drift alignment, but that really needs its own article.
I do these second steps mostly as a check on the first step. Also, in the summer it will probably take a while between when I set up and when it gets dark enough to start shooting anyway, so you might as well fine tune.
Focus and Frame
When the basic alignment is done, you tell the mount to point at a medium-bright star. Center this star in the camera and do a “Recal” operation on the mount. This syncs the position of the star in the catalog with where the mount thinks it is pointing and for the most part allows the Mach-1 to point the telescope pretty accurately.
Note that Astrophysics uses the term “Recal” or “RCAL” to mean the same thing as what most other systems call “SYNC”. This is an endlessly confusing and annoying detail in the Astrophysics software. You have to be careful not to tell an Astrophysics mount to SYNC because its SYNC operation also makes assumptions about what side of the pier your tube is on that may or may not be true if you are not careful. The best thing to do is to tell the ASCOM driver to translate all SYNC requests into RCAL requests. Then you can’t go wrong.
With the star synced up I put the Bahtinov mask on the front of the tube and focus. Here you capture frames and turn the focus knob until the diffraction pattern is perfectly centered, as in this wikipedia page. This mask is a great device.
At this point I also put the dew shield on the telescope so that the front corrector plate does not fog.
Frame the Target
Today I’m taking a picture of a pretty easy target. The galaxy M82 is in Ursa Major and is pretty bright. It also has a unique cigar-like shape as a result of being torn up by some violent gravitational forces from other nearby galaxies. I tell the laptop to tell the mount to point at M82. It goes there.
Then I take a short 10 to 30 second frame with Maxim to make sure we got it right. If the object is off center, I’ll plate solve the picture with PinPoint to find out where I’m really pointed and then use the “center on the place I click” functionality in Maxim to center the picture.
Pinpoint has a lot of knobs, but for the most part I bring up the processing window shown here and just hit the button. Pinpoint works out where it is and then you go back to the telescope control window and click the “Select new Center Point” button to center the target. Maxim will then ask you to click anywhere in the captured image and move the scope to where you clicked.
This all works great as long as you remember to:
Connect Maxim to your mount with ASCOM.
Take the picture to plate solve after you have done step 1. Maxim writes position data into the meta-data of the image file and uses that to run the plate solver.
Guiding Setup
Setting up the guider is usually the trickiest part of the night. First you tell Maxim to take a 2 or 3 second picture with the guider CCD. When all goes well there is a nice bright star right next to the object you are shooting that hits the second CCD in the SBIG camera just right. In that case, you are golden. The guider UI in Maxim has three modes: Expose (to find the guide star), Calibrate (to calibrate the motions of the mount to the motions of the guide star) and Guide (to start guiding). On good nights you go through each of these modes one by one and then Maxim guides perfectly all night. In my experience this happens about 75% of the time.
Two main issues come up when using the guider chip in the SBIG. First, the chip just might not hit any stars that you can guide on. Second, there might be something there, but it ends up being too dim in one of the filters (usually the blue one) to guide on. I then find myself slewing the scope around looking for a good star. If I were more systematic I’d get a piece of hardware that lets me rotate the camera to find a good star. Also, I’d have a more systematic way to lay out the field of the camera in my planetarium software to know where to find a good star.
As it is, I’ve only had real trouble with this once, so I’m putting off adding more complexity to my system until this presents a consistent problem.
One important tip: since the guider CCD in the SBIG cameras sit behind the color filters (more on the filters later) always test the guider using the blue filter before moving on. Usually when you have trouble it’s with the blue filter because many stars are dim in those wavelengths. So testing with the blue filter ahead of time will pay off.
Anyway, once the calibration works, just turn guiding on. Watch the error graph for a while to make sure it seems happy.
Capture Setup
My standard capture routine is for a series of 5 minute frames. I picked 5 minutes because it’s easy to do math with it and it seemed like a reasonable tradeoff between sky glow and image detail. Also, my first few images taken with 5 minute “subs” worked really well so I saw no reason to change.
Each frame is captured in black and white and shot through either a red, blue, green or clear filter. The clear filter captures what we call a “luminance” image.
Exactly how many frames you capture depends on what you want to achieve in the picture. Generally speaking the more frames you take the less noise you will have. Less noise, to a first approximation, means more detail is possible. Therefore, some guys spend multiple nights taking dozens of hours of total exposure to create the very best and noise-free picture that they can. This is not my goal.
My goal is to take a reasonably decent snapshot of more than I can see myself. I’m more interested in seeing some different things than maximizing the image quality. This is originally why I started with the video camera, but I decided that a little more time to improve picture quality was worth it.
I have settled on taking around 10 “L” frames, and then 5 each in R, G and B. This takes a couple of hours per object, give or take. Sometimes I’ll take more on faint objects. Sometimes if I want to fit two objects into a long night, I might go shorter. You’ll notice that what we are really doing here is capturing what amounts to mostly a black and white picture (L) and then layering a bit of color data into it. The black and white data provides most of the detail. The color data just makes it look pretty. A more in depth discussion of exactly how people came up with these scheme is beyond the scope of what I want to talk about here. It’s sort of all a lie, but it works anyway.
For M82 I had early darkness and got set up quickly, so I took a total of about three hours of exposures.
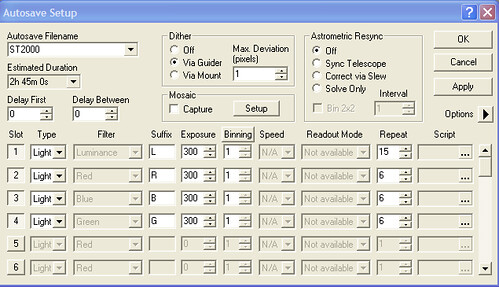
The way you do this in Maxim is to setup what they call an “Autosave Sequence”. As usual, the interface for this is somewhat arcane and tedious. The nice thing is that once you get something you like you can save it and never have to set it up again.
The sequence tells Maxim to capture “groups” of frames each with different filter, binning and exposure parameters. Maxim will then run through these groups in order and take all the frames you need. You also tell it where on your computer to save the frames and you can give it a scheme for generating unique file names with sequence numbers and stuff.
So, I set up a sequence for 15 L frames of 5 minutes each, and then 6 frames with each of the red, green and blue filters, also 5 minutes each. The screen looks like this:
Capture
After you set up the sequence you just hit the go button in the camera control window:
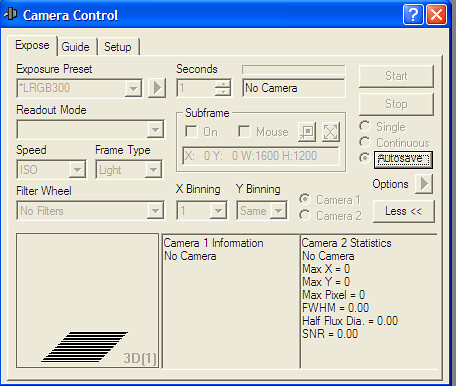
If that screenshot were from a live sequence, the “Start” button would be enabled that that’s the one you would have hit. You can pause the sequence by stopping it and then restart by hitting the Start button again with the control key down, I think.
I use this so that I can stop the sequence in the middle and check focus. Focus will tend to drift over time as the telescope cools off, so while you take frames you have to watch and see if they are getting soft. Maxim also will give you various measures of how sharp it thinks each frame is, so if these change drastically you also know it’s time to focus.
To refocus, I sync the mount then point to a nearby medium bright star. Then I focus again with the Bahtinov mask and then I point back to M82. The mount is good enough to put my target almost exactly where it was before. If it’s a bit off it’s not a huge deal because the image processing software an register the frames just fine as long as they are close.
Now you just sit back and do something to keep yourself busy while Maxim captures the pictures. I tend to surf the Internet or play Counterstrike.
Teardown
When the sequence is finished I turn everything off and tear the mount down. This is basically the reverse of the setup sequence. Warm the cameras up. Cover the scope. Turn the lights on. Disassemble everything. Put it all back in the garage.
Post-Processing
At this point you are done and what you have to show for it is a few dozen large black and white digital pictures of something. Each one looks something like this:
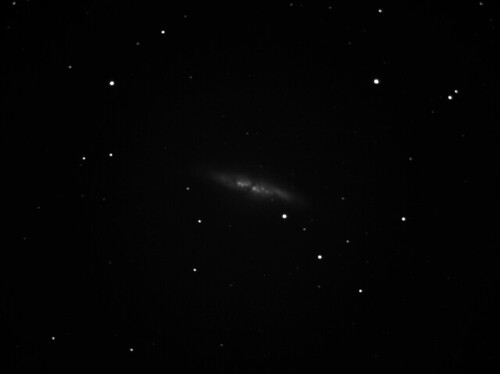
At this point I use Maxim to:
Calibrate each raw frame with the darks and flats I took before.
Register and stack the R, G, B, and L frames into four separate composite images.
The calibration removes all of the fixed noise from the camera and optical system, as we discussed before. The stacking averages out the rest of the noise that we have accumulated while shooting the pictures. There are a ton of different ways to do calibration and image stacking. I pretty much stick to Maxim’s defaults and I tell it to stack using one of the methods that also incorporates a median filter into the process. Using some median filtering allows the stacking process to get rid of pixel values that are very different from the ones that surround them. This is useful for filtering out random noise and sometimes the occasional jet trail. I should cover image stacking techniques in another article.
The final step is to take the final four images and combine them into a single color picture. But that’s a longer story for another time.
More Things to cover next time
Polar alignment details.
Image stacking.
RGB combine and final post processing.